

What is Privileged Access Management?
Privileged Access Management (PAM) is a critical security framework designed to manage, monitor, and control privileged accounts within an organization.
Tools such as Axiom security enable organizations to regulate who has access, when they have it, and how it is granted. This is achieved by implementing Just-in-Time (JIT) access to specific AWS accounts, ensuring that access is provided only when needed.
Why PAM system is a must have for an organization:
1. Simplifies Access Management
-
-
Centralizes the management of privileged credentials and accounts, reducing complexity.
-
Automates routine tasks like password rotations, access provisioning, and session management.
-
2. Protects Against Unauthorized Access
-
-
Ensures that only authorized individuals receive access after submitting a formal access request.
-
Grants temporary access with defined time limits or upon completion of specific actions, minimizing the risk of misuse.
-
Automatically removes access when it is no longer required, ensuring strict control over privileged accounts.
-
3. Establishes the Principle of Least Privilege
-
-
Grants users or requestors only the permissions they need to complete specific tasks.
-
Minimizes the risk of accidental or malicious misuse of privileges by limiting the scope of access.
-
4. Ensures Compliance with Regulatory Requirements
-
-
Provides robust access control mechanisms aligned with regulations such as GDPR, HIPAA, PCI DSS, and ISO 27001.
-
Facilitates auditing and reporting through detailed logs and access records, ensuring organizations can demonstrate compliance.
-
How to integrate Axiom with AWS IAM Identity Center:
To integrate Axiom with AWS IAM Identity Center, ensure you have an active Axiom tenant and AWS IAM Identity Center enabled in your organization. Follow these steps:
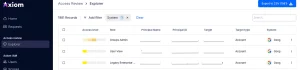
Go to Axiom tenant and create an Integration as it is documented:
-
Download the provided CloudFormation template and deploy it within your AWS organization.
-
Return to Axiom and configure the integration by setting the ARN of the AxiomIntegrationRole created during the CloudFormation deployment.
-
Set a random external ID in Axiom to mitigate the confuse deputy issue. and enhance security.
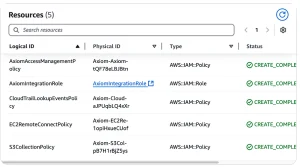
The scan will then process and identify: the list of accounts in the organization, the list of users and roles available for assuming, and the actual policies in place.
Proceeding to Request Permissions
Once AWS IAM Identity Center is integrated, you can proceed to request permissions.
-
Submit the Permission Request
-
The user submits a request specifying the required permissions and justification for access.
-
-
Review and Approve the Request
-
An authorized approver evaluates the request.
-
Upon approval, the required permissions are granted.
-
-
Confirm Access
-
The users can use the new role assignment.
-
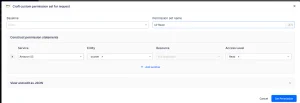
Submitting the permission request

System: AWS
Target: AWS Account inside your organization
Principal: User in IAM Identity Center
Permission: Roles to request that will be assumed
To set gradual permissions, such as granting read-only access to S3 buckets, use Craft.
When this process is complete, a new role with the crafted policy will be created and made available for assumption in your account. If you later decide to tear down the integration, deleting the IAM Identity Center integration CloudFormation stack will remove all resources created by Axiom across all accounts.
Approving the request:

Available Actions for Approvers:
-
Approve – Grant the requested permissions.
-
Deny – Reject the request.
-
Edit – Modify the request partially or completely. The reworked request will be submitted as a new request.
-
Clone – Duplicate the request with the same parameters to create a new one.
-
Rework – Available after the request is approved, allowing further adjustments to the approved request.
Permissions will be reworked automatically based on timing or manually at any time by the requestor, approver, or administrator.
For making multiple requests in a day, templates can be cloned to streamline the process.
Users can start using the newly assigned roles immediately after approval. These roles will appear in the IAM Identity Center without delay following the approval process.
The roles of approver and requestor are defined within Scopes.
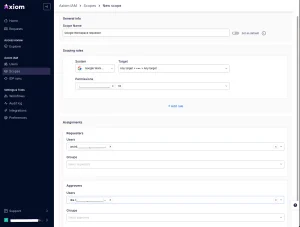
For example, in the Scope above, the user Andrii can request any permission in Google Workspace, and Ilia will act as the approver for these requests.
Auto-Approvals (Workflows)
Auto-approvals can be configured using specific conditions to determine when a request will be automatically approved. These conditions can be applied individually or combined:
-
Duration – The timeline specified in the request.
-
Justification – The justification or comment provided for the request.
-
Permission – The specific role being requested.
-
Principal – The individual who will receive access to the requested role.
-
Requester – The person submitting the request.
-
System – The integration being used (e.g., AWS in this case).
-
Target – The AWS account or other system targeted by the request.
Example Scenario:
You can configure auto-approval to allow or deny requests where a principal requests access to a specific set of roles for a short duration.
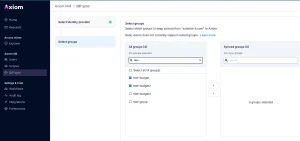
Leveraging Groups:
Groups can be used to centralize and simplify auto-approval workflows for a list of principals. These groups can be sourced from your identity provider (e.g., Google Workspace). By managing developer teams in one place, Axiom will automatically fetch group composition, keeping workflows synchronized and efficient.
Audit and Logging
Permission mappings can be reviewed and downloaded for auditing purposes, ensuring transparency and compliance.
Every operation is logged and includes a JSON representation for detailed tracking and analysis.

Logs can be shipped to an S3 bucket for centralized storage and analysis.

Axiom supports additional integrations, including Google Workspace, Okta, OneLogin, and more.
Axiom can be integrated directly with your identity provider using SAML, enabling Single Sign-On (SSO) for users from your identity provider to access Axiom seamlessly. Example of the SAML configuration via Google Workspaces using custom application.
Summary of the benefits of implementing Axiom security:
-
Enhanced Security: Prevents over-permissioning and ensures minimal exposure by granting temporary access.
-
Operational Efficiency: Reduces delays in access provisioning while maintaining strict controls.
-
Regulatory Compliance: Provides audit trails and ensures access policies meet standards like GDPR, HIPAA, or PCI DSS.
-
Scalability: Simplifies access management across multiple AWS accounts and environments in dynamic organizations.


