

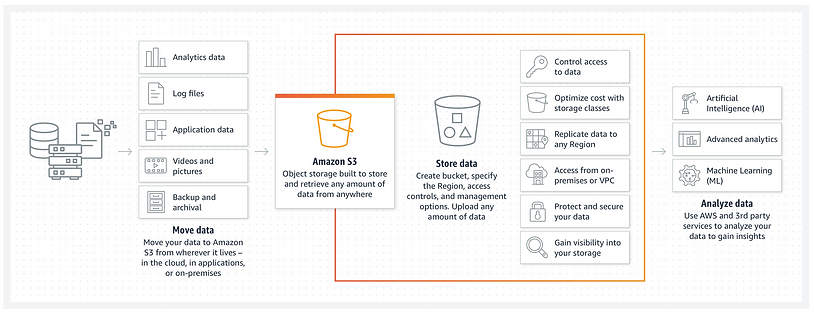
AWS S3 (Simple Storage Service) is an object storage service that can hold literally unlimited amounts of data, where individual S3 objects can range in size from 0 bytes up to 5 TB.
The largest object that can be uploaded in a single PUT is 5 GB. PUT is the action of writing data to a bucket that holds the data. Every bucket has a unique name across all AWS accounts and can not be duplicated or copied when initially created.
S3 is highly flexible. You can store any type and amount of data you want, read the same piece of data a million times or only for emergency disaster recovery, or build a simple FTP application or a sophisticated web application such as the Amazon.com retail website. Amazon S3 frees developers to focus on innovation instead of figuring out how to store their data.
It is organized as a simple key-based object store and has a data durability of 99.999999999% – yes, that’s eleven 9s, which is pretty impressive if you ask me! You can store your data in any region you wish (although S3 is considered a global service), and utilize any number of storage class options to ensure your data survivability and durability according to usage and the invoice you wish to get at the end of the month. With prices always going down, this service is one of the best places to store your data on.
I could go on and on about this industry-leading service in terms of durability, availability, performance, security, and virtually unlimited scalability, but we are here to speak about something else: how to harden your S3 bucket.
An important step
So you got your first bucket, that’s awesome! Now, how can you keep your kids photos, or your bills, safe? Or maybe this is the first production-ready breakthrough software that will disrupt the entire tech market. How can you make sure those pesky hackers keep their hands to themselves?
Well, 100% assurance can only be guaranteed if you shut down your computer, disconnect it from the network and place it in an underwater safe…with sharks that have lasers as eyes circling around. Well, not quite, but you get the point. But what I can do is to provide you with the next best thing. In this blog, I have brought together all the best practices needed to make your S3 bucket rock solid in one place. I will not mention the basic steps of using a bucket policy, but rather the advanced steps you should take to further protect your buckets. Let’s start!
S3 bucket policies
S3 bucket policies should only allow requests that use HTTPS. HTTPS is used as a “tunnel of data” engulfed with an encrypted connection made possible by an SSL certificate. When S3 buckets are not configured to communicate between clients (users, applications, etc.), S3 bucket data is vulnerable to eavesdropping and man-in-the-middle (MITM) attacks.
The following bucket policy makes clear: “Deny all actions from all principals when the condition of SecureTransport is false” (that is, no HTTPS).
Policy Example:
“Effect”: “Deny”,
“Principal”: “*”,
“Action”: “*”,
“Condition”: {
“Bool”: {
“aws:SecureTransport”: false
}
}
Example: https://aws.amazon.com/premiumsupport/knowledge-center/s3-bucket-policy-for-config-rule/
Examine your policies
Identify those policies that allow wildcard IDs, and use the “least privileged” method when allowing principals access to your data.
One undeniable universal truth of the security world is, “Security is hard!” (Try reading it in the tone of a 4-year-old who’s mother told him to do the washing up before dinner. Yes, security is hard. It’s why you need to give it the proper respect and only allow actions and principals that you actually want to be able to access that specific data.
S3 is especially hard, since there are other actions that you need to add on top of those you thought should be applied. For example, for PUT actions you generally need to add the list bucket action as well. If you don’t, your action will fail and you might not get the proper error message. This may make you guess why it failed, only to result in placing a wildcard as an action. And guess who likes wildcards as an action? Absolutely everyone!
Wildcard as an action can usually be found with:
An AWS User, Principal, or Service Principal
aws:SourceIp
aws:SourceArn
aws:SourceVpc
aws:SourceVpce
aws:SourceOwner
aws:SourceAccount
Aws:userid
s3:DataAccessPointArn
S3:x-amz-server-side-encryption-aws-kms-key-id
Your S3 policy
Important steps to take:
- Explicitly deny all delete actions (besides those who need it, of course).
- Allow GET actions only for specific principals. Bad actors can get your data and no one will know about it. This leads us to another scary word – Monitoring. You can find further details on this later.
- Allow PUT actions only for a specific principle (so no one will plant malware in your bucket, or place a rival’s new app in your bucket and call you a culprit of industrial espionage).
- Find bucket policies with non-existent, blocked or deleted IAM users. This will show you if anyone already has access to your system and changed the policy, potentially waiting for the right moment to attack.
IAM policies vs. S3 bucket policies
Generally speaking, IAM should be used for all resources except S3, and as for S3, use “S3 bucket policies”.
ACL is the legacy version of IAM. But, by adding ACL, you’re adding a second layer of security for those who can access the buckets. In this regard, it is similar to how EFS manages its storage permissions.
More info on this here.
Enable MFA for Delete
When a bucket is Multi-factor Authentication (MFA) Delete-enabled, a bucket owner must include the “x-amz-mfa” request header in requests to permanently delete an object version or change the bucket’s versioning state.
In addition, requests that include “x-amz-mfa” are required to include HTTPS. A header’s value contains an authentication device’s serial number, authentication code, and a space. Failure to include this information in the request header results in a failed request.
This is one of those configurations designed for a doomsday scenario, because it may be a little bit overwhelming to click “allow” for each deletion request. I would enable it only for “super duper” use cases.
Encryption
At transit and at rest. (KMS \ SSE \ Zip \ tar the object itself with another password\ encryption key for a second layer of security).
Encryption at transit is enabled by MFA & SecureTransport, so you are already in a good place when enabling HTTPS.
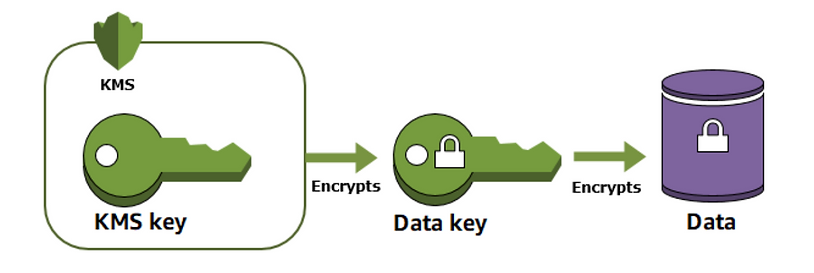
Using envelope encryption – encryption upon encryption:
The main problem with encryption is that even if you use 10 layers of encryption, you eventually have to place the last key somewhere. You or your application can read it in plaintext mode, so protecting the key becomes your number one priority. One strategy is to encrypt it as well.
Envelope encryption is the practice of encrypting plaintext data with a data key, and then encrypting the data key under another key. You can even encrypt the data encryption key under another encryption key, and encrypt that encryption key under another encryption key. Made your head spin on that one, didn’t I?
AWS KMS helps you to protect your encryption keys by storing and managing them securely.
You can read more about envelope encryption here.
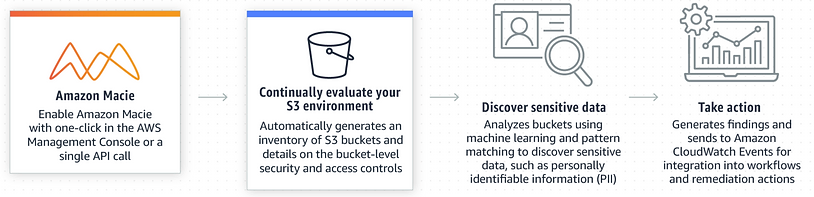
Amazon Macie
Amazon Macie can be used to scan for sensitive data outside of designated areas. However, Macie is one of the more costly services AWS provides, so think carefully if you need this in your environment.
S3 Object Lock
This feature lets you store objects using a write-once read-many (WORM) model. By using an Object Lock, you can prevent an object from being overwritten or deleted for a fixed time period, or indefinitely, thus protecting the validity of your data.
AWS Trusted Advisor \ AWS Config Rules
Use AWS Trusted Advisor and “s3-bucket-public-read-prohibited” and “s3-bucket-public-write-prohibited” managed AWS Config Rules to monitor your buckets.
Presigned URLs
You can grant access to an external user without creating any resources in its name, such as local user, IAM roles, S3 bucket policy. In this way, there is nothing to change on the policy and nothing to miss when you need to deny access for that user.
Instead, just create a temporary presigned URL, and all will be good in the world (and your bucket security).
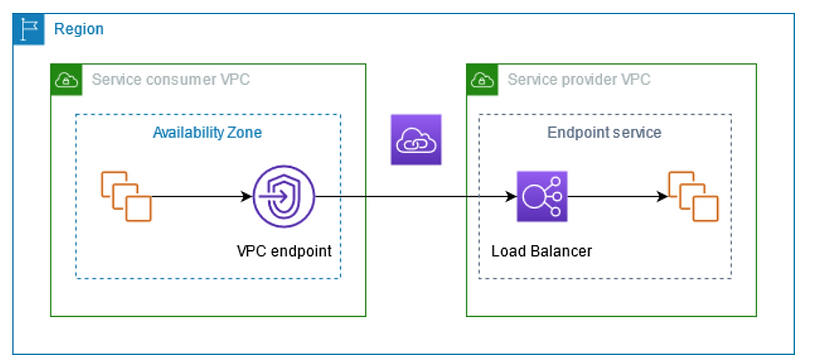
VPC endpoints
The data will not go through the internet using VPC endpoints. This is similar to the HTTPS option, just the other way around.
The data will flow through the AWS backbone network channel, and will not provide an opportunity for hackers to try and break your HTTPS connection, or run a DDOS attack to prevent the client side from getting its data.
AWS CloudFormation Drift Detection
For objects uploaded by CloudFormation, drift change is a concern, since it means the data has been tampered with. Either new permissions have been inserted or your code could have been changed.
Proper CORS setup
Allow access via proper CORS setup (if accessing from outside the account, especially for web hosting).
CORS stands for Cross-Origin Resource Sharing, and it allows restricted resources on a web page to be requested from another domain outside the domain from which the first resource was served. It is one of the steps for mitigation of CSRF attacks.
SCP
- Block public S3 buckets at the organization level (SCP). In this way, if an account is breached, there is still a security layer in place from the master account.
- Use prefixes or tags for specific files\folders, and protect them with your SCPs.
Monitoring
So far, we discussed S3 hardening, but I promised to address the other giant elephant in the room – monitoring. This is an important part of keeping your data (or your infrastructure, for that matter) safe.
External search engine: Actively search for open buckets using an external search engine specifically designed for S3 buckets. This resource alone can make you understand how big this matter is and how easy it is to get data from other unsuspecting parties.
There are several search engines that can provide such findings, but https://buckets.grayhatwarfare.com/ seems to be the best.
Own search tool: Create your own search tool using a lambda function that can scan your buckets and see if they are public or not. In this way, you don’t have to rely on an external service that may or may not have ties with the hacking community.
Build a mechanism: You can also build a mechanism that will try to delete specific files on a bucket to verify the validity of your configuration and implementation of your bucket policies.
This is how S3 buckets are represented on the internet:
http://s3.amazonaws.com/[bucket_name]/ or http://[bucket_name].s3.amazonaws.com/
If someone wants to test the openness of a bucket, all they have to do is hit the bucket’s URL from a web browser. A private bucket will return a message “Access Denied”, and no bucket content will be displayed. However, clicking the URL for a public bucket will list the first 1000 files contained in that bucket.
Enable Amazon S3 server access logging: Although a good suggestion, is a bit of a pain. This option logs every action performed on the bucket. Sadly, it will not provide too much detail about who made the request – just that it was made.
It might also confuse you at a later date, let’s say five years from now, where you are tasked with cleaning up company buckets and don’t understand why this bucket is still working hard for a user that left the company years ago. It is quite the security conundrum.
CloudWatch alerts: Particularly PutRequests, GetRequests, 4xxErrors, and DeleteRequests.
So, there you have it. I have reviewed and explained the best practices for you to choose when going about hardening your S3 bucket.
Now, go out into the world, and make better and safer storage for us all!


