In this blog, we will talk about EFS, some relevant use cases, usability and some challenges I faced while using this service.
What is EFS?
EFS stands for Elastic File System – a managed service provided by AWS. It is similar to an NFS service that you are probably already familiar with (Network File System).
EFS enables you to create and configure a shared file system without any provisioning, deploying, patching, or maintenance. EFS will automatically scale up or down as files are added or removed, and can burst to higher throughput if needed. By default, EFS utilizes high availability and durability (99.999999999% – yep, that’s 11 nines).
You can connect EFS to numerous services such as EC2, ECS, EKS, Fargate, Lambda and local servers.
We can talk all day about storage types and classes, backups and monitoring, but I want to get to the good stuff…
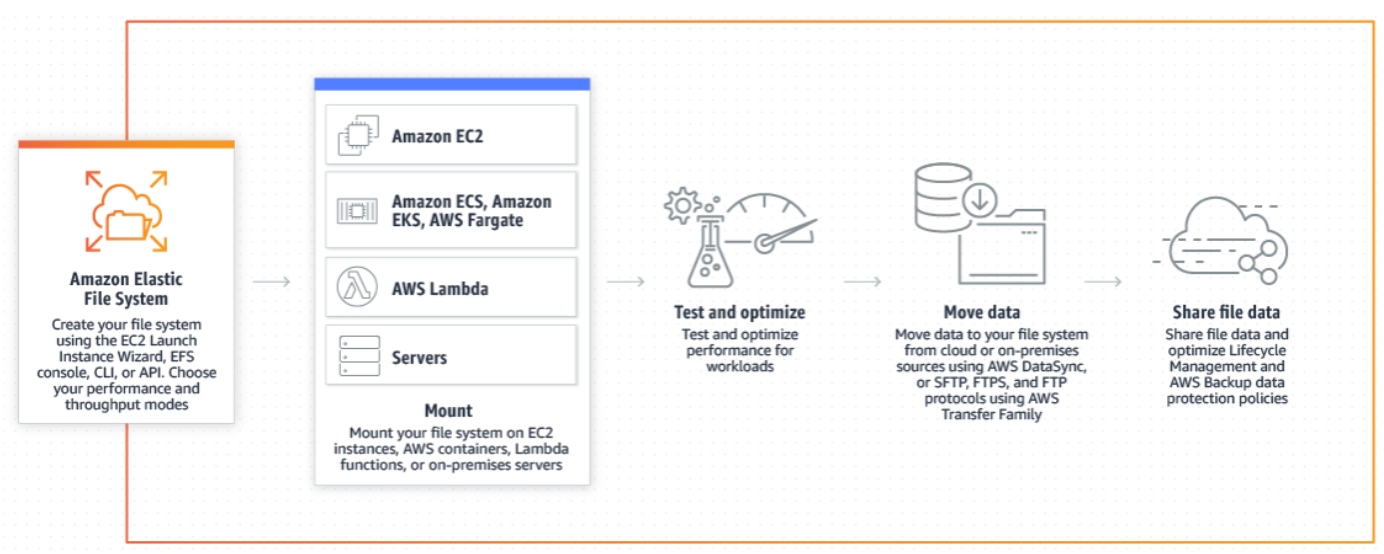
Connecting your EFS
There are a couple of ways to connect your EFS, network wise:
The first and by far the easiest method is to mount it onto an EC2 when they both reside in the same VPC.
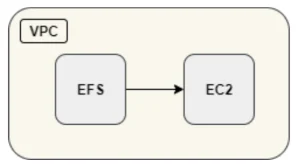
Mount command with NFS
mount -t nfs4 -o nfsvers=4.1,rsize=1048576,wsize=1048576,hard,timeo=600,
retrans=2,noresvport fs-12a34b56c78d.efs.us-east-2.amazonaws.com:/ /mnt/efs_folder
You can also add it to /etc/fstab as a persistent mount point that will not change after restart. While testing NFS on EFS, I was not able to properly use ‘nfs4_acl’ package, and encountered many issues with it.
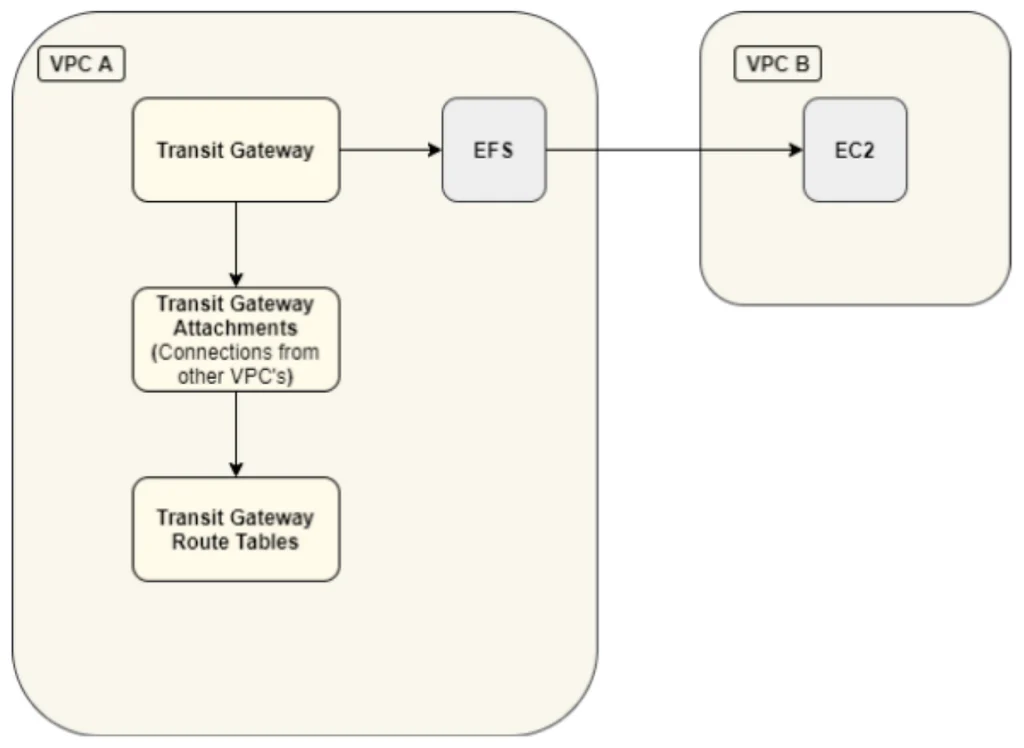
If you want to allow other services that reside in different VPCs to connect to your EFS, you can use a peering connection or transit gateway between two or more VPCs, or you can even go the distance and use ALB, NLB or a Service Endpoint (Private link).
The latter is a specialized use case that even AWS Awesome support wasn’t sure if it would work… *Spoiler* We got it to work ;-).
When should you use peering versus transit gateway, you ask? Good question grasshopper, I am glad you asked.
- Peering is a single network connection which enables you to route traffic between two different VPCs (see more here).
- Transit gateway is basically a “router in the clouds”. It will easily connect between your on-prem networks and those you have on AWS. If there comes a time when you have too many VPCs, peering or VPN connections to handle, then TGW is the better choice to use. It provides a single gateway for your network needs (see more here).
Transit Gateway connection diagram
Service Endpoint connection diagram
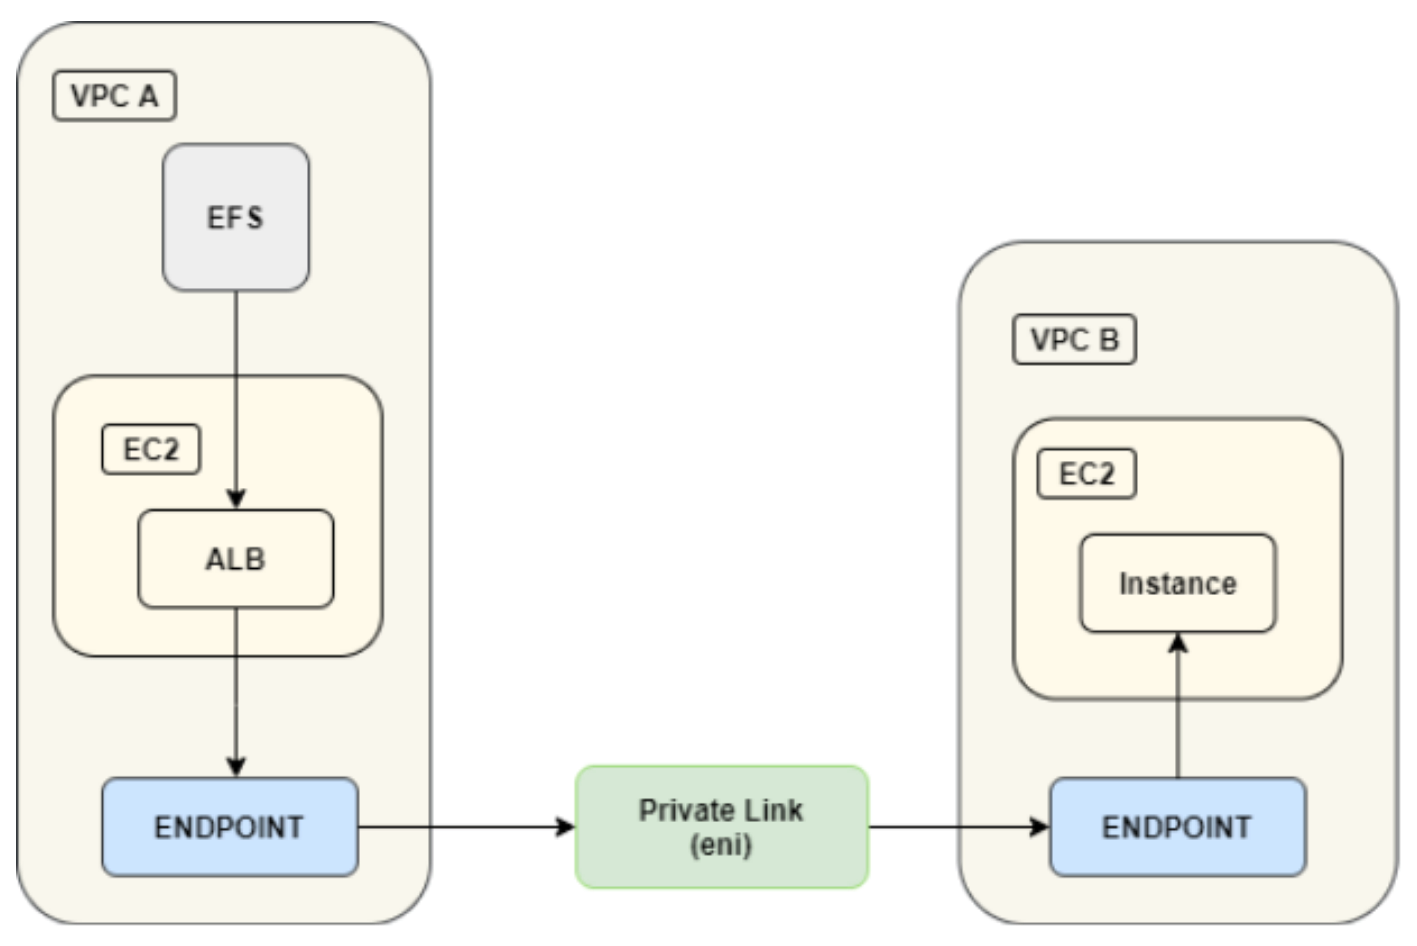
The mount command for the endpoint is as follows:
mount -t nfs4 -o nfsvers=4.1,rsize=1048576,wsize=1048576,hard,timeo=600, retrans=2,noresvport vpce-1a2345678b1234c1-ab12abcd.vpce-svc-112a3456b78910cd.us-east-2.vpce.amazonaws.com:/ /mnt/efs_folder
If you wish to use the /etc/fstab file, add this line:
vpce-1a2345678b1234c1-ab12abcd.vpce-svc-112a3456b78910cd.us-east-2.vpce.amazonaws.com:/ /mnt/efs_folder nfs4 nfsvers=4.1,rsize=1048576, wsize=1048576,hard,timeo=600,retrans=2,noresvport 0 0
As you can see, we are not using the EFS ID or EFS DNS name when mounting, but the VPC Endpoint!
After we had great fun building the infrastructure, we are now ready to configure the EFS. Let’s get cracking!
Configuring the EFS
In the initial page, you will create the file system.
Insert the desired name and the location of your VPC:
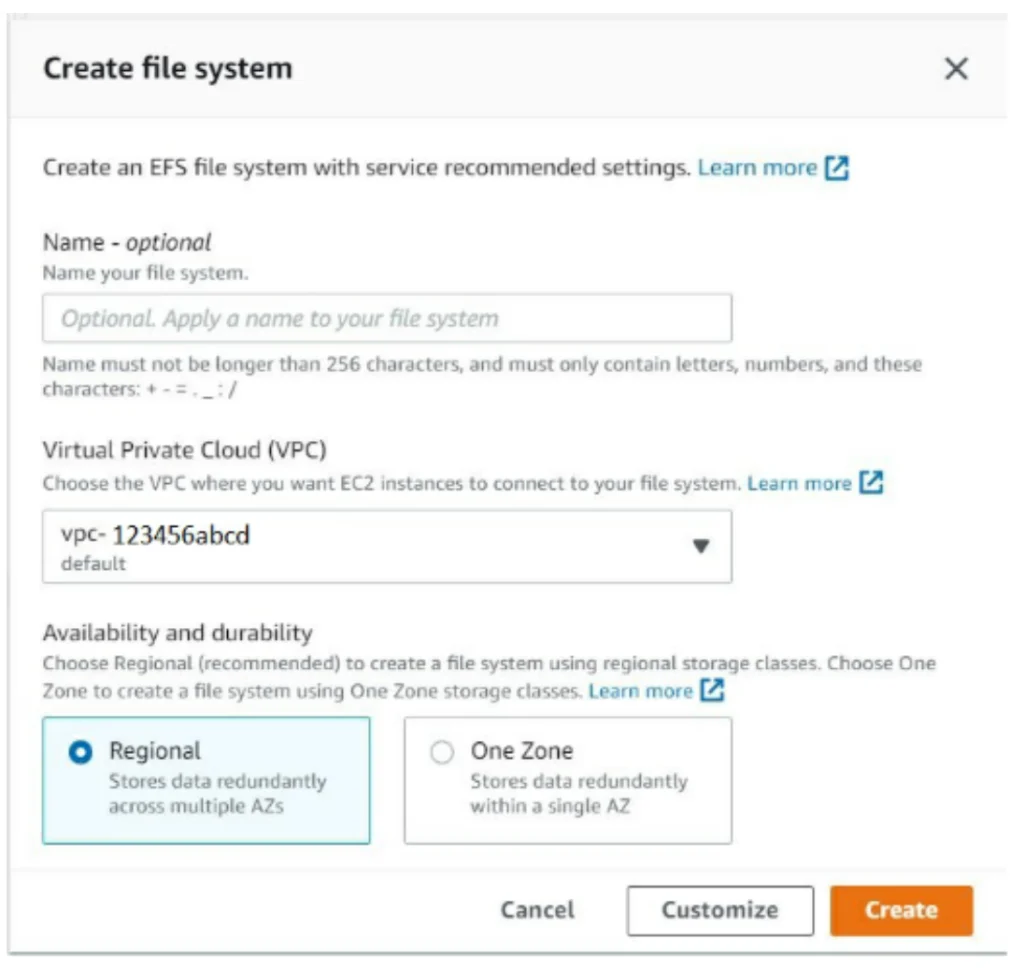
Once created, you will be able to view and manage your file system size, monitoring, tags, EFS policy access points and network.

Click Edit to perform some basic configuration, such as adjusting your backups, storage tier (A or IA), and throughput mode. Note that encryption is enabled by default.
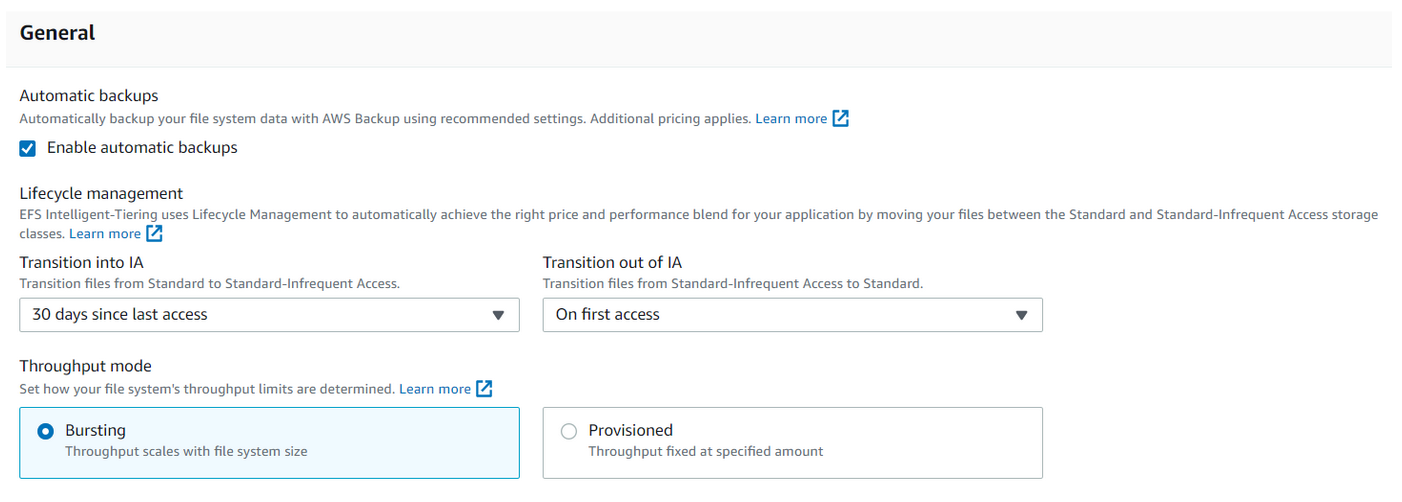
Creating the EFS is not enough, though.
You need to create access points – which can be considered as folders.
Creating access points
There are many ways you can set up EFS. Use it as one giant folder under root, or set up multiple folders for each user \ group \application storage. You can go even further and divide each access point to be used by different local OS users, each one with its own set of permissions.
If you want to allow root access to the entire EFS, select / (root location).
This is the place to note that you need to differentiate between the two root concepts. Local OS folder \ user – for both EFS and OS, so make this distinction.

Pillars of security
There are a couple of ways in which you can configure permission level for the EFS:
- Use an IAM role with specific permissions, and copy that policy to the EFS policy as a second layer of protection.
- Use the IAM role as a dummy role, and have EFS handle all permission levels.
Take a minute to think about those two options. Which one is the best? Which one would you use?
Well, in my mind – neither of them.
The first one will not really double the protection because IAM roles hold greater power than the EFS policy, and it will only cause you to work twice as hard when updating policies.
The second is just plain silly, since the mount uses IAM as a real security layer – it is wasteful not to use it. Furthermore, it only opens the possibility for errors during IAM role clean up. Nobody will understand why there are dummy roles and, as a result, the dummy roles may be deleted and you can guess what would happen immediately after that.
The best method is to treat each service (IAM, EFS, EC2 and VPC) as a separate, independent security pillar.
- Use the IAM role as the user pillar; a way to manage users \assumed roles and provide them with specific access (like read, write, mount, etc.)
- Use EFS as the storage pillar; EFS policy will protect everything related to EFS access (we’ll see later on how this is handled)
- Use EC2 as the local OS pillar; define what to use in your mount entry – should you use IAM?
- TLS? Should you grant specific access to users or have open access to anyone on the access point?
- Use VPC as the network pillar; should you use a simple network connection or a private link?
EFS policy
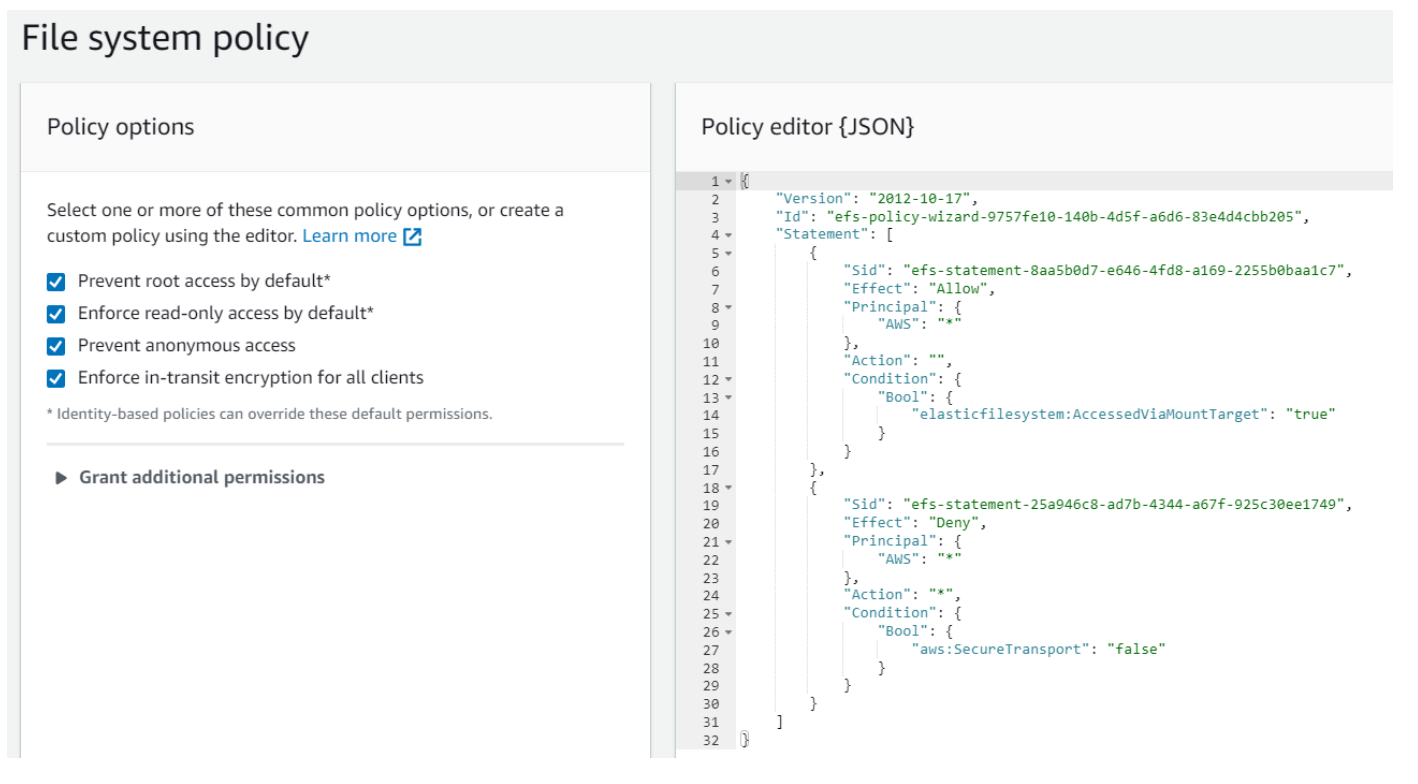
As you can see in the example below, in the left pane we’ve prevented root access, enforced read-only access, prevented anonymous access, and enforced in-transit encryption.
This, combined with the EFS encryption at rest, seals the deal. Data is encrypted, and writing\reading will not happen unless it is encrypted. A win for ‘team encryption’.
IAM role
In order to use IAM role as an enforcer of who can actually mount or write\read the access point, you need to be able to add an “instance-profile» to your EC2 instance.
Mind you – only one instance-profile can be added per instance. Having said that, you should remember that if an SSM connection is needed, then the role should have SSM connectivity as well; otherwise SSM will not work without these policies; «AmazonSSMManagedInstanceCore», «AmazonS3ReadOnlyAccess».
IAM roles override EFS policy: if “ClientRootAccess” is granted on the IAM level but denied on the EFS level, then root would still be able to write to the EFS.
Root squashing:
Understanding the concept of root squashing is important. By not mentioning ClientRootAccess, you are effectively blocking root (local OS user) from being able to write to the EFS.
On the other hand, don’t forget that only root can mount the EFS (see more here).
Mount, Read & Write, for a specific EFS access point:
If you want to allow root access to the EFS (that is, allow access to all files and folders), use the «ClientRootAccess» permission. For read-only permission, use “ClientMount”, which seems redundant since a non-root user without write capabilities can only read, but since there are no read permissions, for all intent and purposes the “ClientMount” is read-only.
IAM role example

EC2
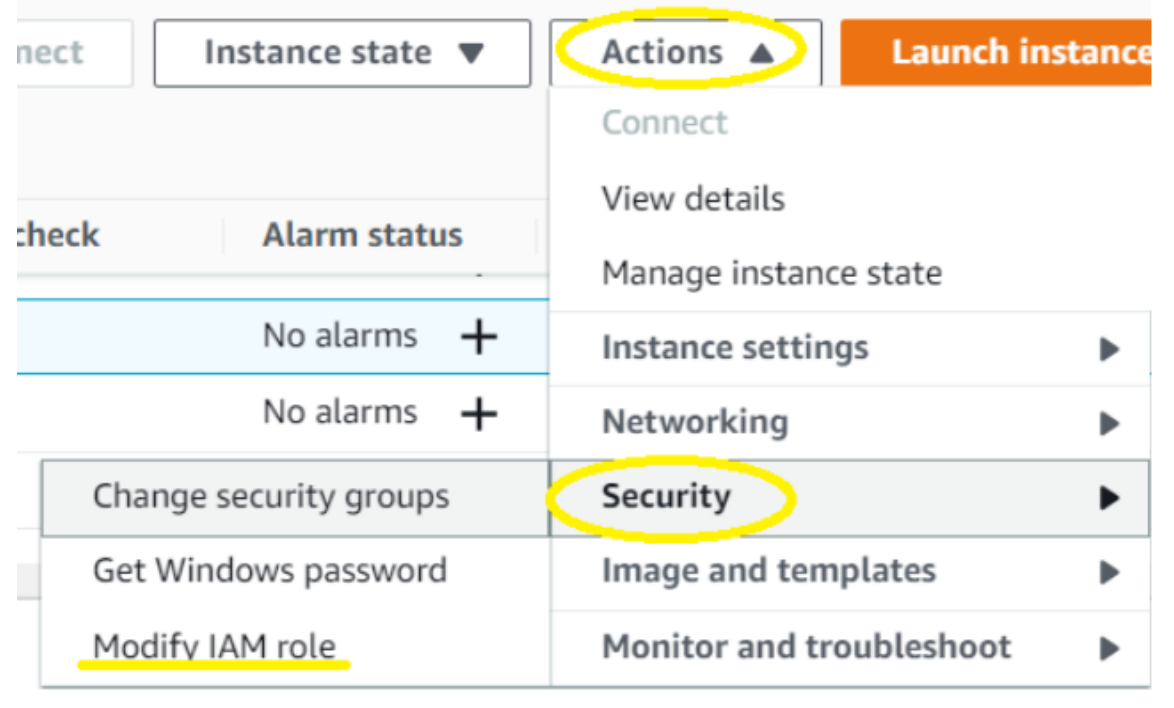
In the EC2 console, add the desired IAM role. This will allow the instance to assume the role, which will grant the instance connection to EFS.
Initial EC2 local setup
If your environment requires the usage of a proxy, you need to set it up in order to download the amazon-efs-utils package (otherwise you can’t use EFS as a file system, only NFS).
To do this setup:
- First, export your http_proxy & https_proxy variables into your environment variables (use the ‘env’ command to review). For example:
export http_proxy=http://proxy.url:port
export https_proxy=http://proxy.url:port - Now run: yum install -y amazon-efs-utils
- Next comes one of the most important steps. If you miss this step, you’ll face a very long debug session trying to understand why it is not working… (don’t ask me how I know (-:).
Add the Mount Target IP address to the /etc/hosts file (see this guide). For example:
echo «10.0.0.10 fs-12a34b56c78d.efs.us-east-2.amazonaws.com» | sudo tee -a /etc/hosts - Do the same for all of the IPs in the Network tab in your EFS console. Even if every IP is located in a different availability zone, using any of those two IPs doesn’t affect EFS usability, meaning using different AZs doesn’t affect EFS performance.
- Alternatively, you can create a private hosted zone on Route53 instead of adding it to the hosts file.
STS
STS is not really required for the EFS setup process, but I did find it to be extremely helpful for the process of debugging, so I believe it is important to add this section as a part of the regular setup.
If an instance doesn’t have access to an STS endpoint, running “aws configure” is needed. This means that you need to install AWS CLI if it’s not already installed on your system (see how here). The config file should be created with the root Linux user, who is the only one who can mount the EFS.
Note: If you don’t use the config \ credentials file, you can add any random character in the wizard for it to create an entry, but remember to remove those later. If you do use the config file, just add the missing parameters to the config file:
EC2 region location: `region = us-east-2`
STS: sts_regional_endpoints = regional
In the end, it should look like the following (if your config file is empty):
[root@hostname ~]# cat ~/.aws/config
[default]
region = us-east-2
sts_regional_endpoints = regional
[root@hostname ~]# cat ~/.aws/credentials
[default]
Helpful hint: When changing IAM roles for the instance, verify it was changed correctly by using aws sts get-caller-identity
Expected response:
{
«Account»: «123456789012»,
«UserId»: «BTJACXS7FHFUTC8RANA4F:i-12345abcdef6789»,
«Arn»: «arn:aws:sts:: 123456789012:assumed-role/EFS_Role/i-12345abcdef6789»
}
Local OS users and configurations
Local user is an added control layer that can be used on EFS. Remember that only root can mount, and without specific permission at the IAM level, root cannot write on non-root access points (EFS Level).
You can grant access for a specific user (1002 for example) to a specific access point on IAM and on EFS console. Just provide the user \ group id and you are all set. The cool part is that even root cannot modify these files, only read them. It’s starting to feel like an onion with all of these (security) layers!
Other than that, a root user that has mounted the root access point can create folders for other local users and provide them access to their specific folders on a specific access point. In other words, initially mount the root folder with root user and root access, then create all folders with the users permissions, then finally mount again with a specific access point of a non-root user.
For example:

Mounting
Create the mount point:
Run as root at the path of your choosing: «mkdir folder_name»
For example, run:
cd /
mkdir efs_folder
Outcome: /efs_folder is the absolute path for the new EFS mount point.
Check the Instance File System to verify its status, run:
df –hT
>>>
Filesystem Type Size Used Avail Use% Mounted on
devtmpfs devtmpfs 1.9G 0 1.9G 0% /dev
tmpfs tmpfs 1.9G 508K 1.9G 1% /run
tmpfs tmpfs 1.9G 0 1.9G 0% /sys/fs/cgroup
/dev/nvme0n1p1 xfs 30G 1.6G 29G 6% /
tmpfs tmpfs 389M 0 389M 0% /run/user/0
We can see that we don’t have anything mounted on our instance.
Let’s go ahead and add the EFS mount point to the /etc/fstab file:
UUID=1b81d5dg-690e-6018-a884-0e3d16b614ec / xfs defaults,noatime 1 1
// Default system disk – Don’t touch it!
fs-12a34b56c78d.efs.us-east-2.amazonaws.com:/ /efs_folder efs _netdev,tls,accesspoint=fsap-678901212345hijkl,iam 0 0
// Add the new mount point
Let’s go over the mount gibberish we’ve just added and decipher it line by line:
- «fs-12a34b56c78d.efs.eu-west-1.amazonaws.com:/» is the DNS name of the EFS specific file system.
- «efs_folder» is the mount point of the EFS. You will see only the folder for which you have permission.
- «efs» is the file system that will be used by the server (like NFS, EXT4, xfs, etc.)
- «_netdev,tls,accesspoint=fsap-678901212345hijkl,iam» are the options of the mount.
** Never forget to use the «_netdev» option, otherwise your server may become unstable.
** You must use «tls» if you want to use EFS as the file system.
** «accesspoint=fsap-678901212345hijkl» is the id of the mounted access point.
** iam is for the usage of the iam role enforcement.
The mount command (/etc/hosts) has to include tls, iam and specific EFS & access point Id in order to work, thus making sure all the key parts are used.
Once done, try to mount the newly added access point by running the command: “mount –a”
If successful, you can rerun the df -hT command and see the EFS as mounted:
127.0.0.1:/ nfs4 8.0E 6KB 8.0E 1% /efs_folder
If you noticed that the file system stated as nfs4, good for you! But that is to be expected.
Now that EFS is mounted successfully, we are good to go. If you encounter any issues, please continue reading.
Troubleshooting
A super important hint: If you change anything on the IAM or EFS level, you need to unmount and remount EFS again for it to take effect.
If you fail to add the «Mount Target IP address» to the /etc/hosts file or Route53 private zone, you will see this error:
“failed to resolve «fs-12a34b56c78d.efs.us-east-2.amazonaws.com» – check that your file system ID is correct, and ensure that the VPC has an EFS mount target for this file system ID.”
If you try to mount an access point where you don’t have permission, you will get this error:
«mount.nfs4: access denied by server while mounting 127.0.0.1:/«
If you experience any other issues, see here and run the `AWSSupport-CheckAndMountEFS` SSM run book to verify your configuration.
If a user has only read-access (IAM level) and tries to write, (in this example with the touch command), the following error appears:
‘cannot touch ‘file’: Read-only file system’
This differs from the regular “access denied” error, so it will help you to understand who is denying your access.
If you’ve reached this point, I salute you! But if that wasn’t enough and you want to learn more about this topic, see here.
To summarize our journey of mounting EFS on our EC2, what have we learned other than the fact that whoever created this service REALLY likes permissions in all shapes and forms?
Just remember the four pillars of security, think about your network configuration, and you are all set…Simple, isn’t it?

